I know today is Pink Wednesday, but I'm still rocking my Sally Hansen Salon Effects in Hot Wired so I didn't do a pink mani today. Although, I think I will remove the Salon Effects tonight because I just can't stand having the same design on my nails this long, haha. I thought I'd leave them on all week because of my busy schedule, but no, not the case. Plus, I need to practice my Jason Mraz nail art designs since I'm going to his concert on Sunday! Jason Mraz nail art designs are coming soon :)
Anyhow, I searched high and low for Orly Fowl Play in stores within an hour of me, and nobody had it! I finally gave in and ordered it directly from Orly's website (along with a back-up bottle of Fowl Play, and two other shades to make shipping worth the purchase). I used it the day I received it, then decided to play around with some rhinestones.
I don't know if I really like the rhinestones or if I do like it, but I'm just not used to seeing them on my nails. I took this mani off shortly after I took the photos because I just wasn't 100% thrilled with the rhinestone addition. Not to mention, you can really see the clear polish that attached the rhinestones (although you really couldn't see it all that well in person... it's just the photo lighting and the close-up photos really show everything).
Let me know what you think.
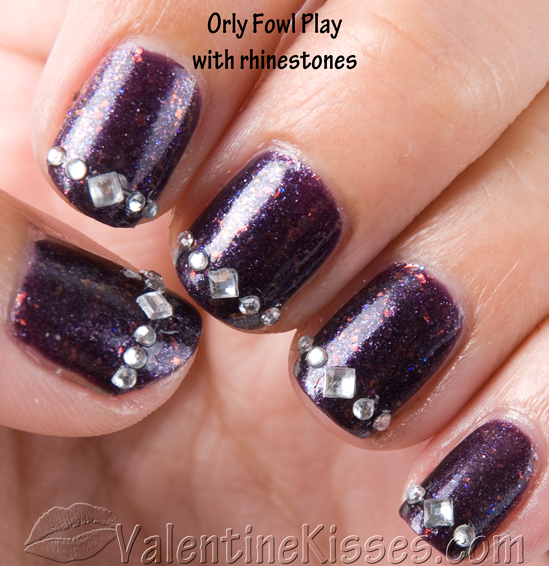
To re-create this NOTD:
- 1 coat of Essie's First Base Base Coat
- 2 coats of Orly polish in the shade Fowl Play
- 1 coat of Seche Vite Dry Fast Top Coat to make sure Fowl Play is nice, dry, and shiny.
- Using a clear polish (I used Essie's 3-Way Glaze), attach the rhinestones in a straight line across your nail near the tip.
- I used a square rhinestone (turned to a diamond shape) as the center point, and used round rhinestones next to it (2 on each side; except on my pinky I used 1 on each side and on my thumb I used 3 on each side).
- To attach the rhinestones I just take the clear polish brush out of the bottle, turn it upside down (so the brush is facing up) and leave it sit on the table while I pick up my rhinestones with tweezers. Then I take the rhinestone to the clear polish brush and get clear polish on the back of the rhinestone, then place it on my nail. I re-did the clear polish brush back into the bottle as needed (usually every nail because I used so many rhinestones on each nail, and I was taking my sweet time).